今回のレッスンは Lesson 1 のソースコードをベースにプログラミングするため、lesson-02 ディレクトリ(自分自身がわかるディレクトリ名ならばなんでも可)を作成し、Lesson 1 のディレクトリから .git, .next, node_modules 以外のファイルを複製してレッスンを進めます。
Lesson 1 のソースコードを複製した場合は、作業を進める前に cd コマンドで Lesson 2 のディレクトリに移動したうえで、必ず以下のコマンドを実行してください。今回のレッスンで作成する最終的なソースコードを確認したい場合は、ページの最後の 最終的なソースコード から GitHub リポジトリにアクセスしてソースコードをダウンロードしてください。 1. Airstack Node SDK のインストール まず最初に、Airstack API との統合を始めるために Airstack Node SDK のインストールが必要なため、以下のコマンドで必要なパッケージのインストールを行います。
npm install @airstack/node
2. ローカル環境変数に API キーを追加 次に、Airstack API に必要な API キーの設定を行っていきます。
ただし、API キーは漏洩すると悪用される恐れがあるため、API キーの値を直接プログラムのソースコードに記述することは望ましくありません。
そのため、Airstack API キーの取得 で取得した API キーをプログラム側からを利用可能にするためにローカル環境変数のファイルを用意し、そのファイル内に API キーの値を保存します。
具体的には、プロジェクトのディレクトリ直下に .env.local ファイルを作成し、その中に AIRSTACK_API_KEY={your_api_key} と記述し、保存します。
これにより、プログラム側から process.env.AIRSTACK_API_KEY と呼び出すことにより、その値を読み取ることが可能になります。
2. 変数 frames の外部ファイル化とエクスポート API 連携を実装する際に createFrames 関数内でミドルウェアとして Airstack Hubs を設定する必要がありますが、メンテナンス性を考慮した場合、変数 frames を外部ファイル化して使いまわすほうが効率的なため、変数 frames を外部ファイル化します。
/app/frames ディレクトリ直下に frames.tsx ファイルを作成します。/app/frames/frames.tsx ファイル内に /app/frames/route.tsx ファイル内の以下の部分をコピー&ペーストします。
import { farcasterHubContext } from "frames.js/middleware" ; import { createFrames , Button } from "frames.js/next" ; import { appURL } from "app/utils" ; const frames = createFrames ({ basePath: "/frames" , middleware: [ farcasterHubContext ({ // remove if you aren't using @frames.js/debugger or you just don't want to use the debugger hub ... ( process . env . NODE_ENV === "production" ? {} : { hubHttpUrl: "http://localhost:3010/hub" , }), }), ], }); const handleRequest = frames ( async ( ctx ) => { return { image: ` ${ appURL () } /01.png` , // http://localhost:3000/01.png buttons: [ < Button action = "post" target = "/next" > 次のページへ </ Button > , ], }; }); export const GET = handleRequest ; export const POST = handleRequest ;
変数 frames を他のファイルからインポートできるように、このファイルに必要なファイルをインポートしつつ、変数を export します。
import { farcasterHubContext } from "frames.js/middleware" ; import { createFrames } from "frames.js/next" ; export const frames = createFrames ({ basePath: "/frames" , middleware: [ farcasterHubContext ({ // remove if you aren't using @frames.js/debugger or you just don't want to use the debugger hub ... ( process . env . NODE_ENV === "production" ? {} : { hubHttpUrl: "http://localhost:3010/hub" , }), }), ], }); 3. Airstack Hubs の設定とローカル環境変数のロード 変数 frames の外部ファイル化が終わったら、createFrames 関数のミドルウェアとして https://hubs.airstack.xyz を設定し、ローカル環境変数から API キーの値を設定します。
import { farcasterHubContext } from "frames.js/middleware" ; import { createFrames } from "frames.js/next" ; export const frames = createFrames ({ basePath: "/frames" , middleware: [ farcasterHubContext ({ ... ( process . env . NODE_ENV === "production" ? { hubHttpUrl: "https://hubs.airstack.xyz" , hubRequestOptions: { headers: { "x-airstack-hubs" : process . env . AIRSTACK_API_KEY as string , }, }, } : { hubHttpUrl: "http://localhost:3010/hub" , }), }), ], }); 4. 変数 frames の削除とインポート 変数 frames を外部からインポートする場合、元々記述してあった変数 frames をそのままにしておくと、同じ変数名が存在するコンフリクトの状態になりエラーが発生するため、インポート文を追記しつつ、元々記述してあった変数 frames のコードを削除します。
import { farcasterHubContext } from "frames.js/middleware" ; import { createFrames , Button } from "frames.js/next" ; import { frames } from "app/frames/frames" ; // 追記 import { appURL } from "app/utils" ; // 削除 const frames = createFrames ({ basePath: "/frames" , middleware: [ farcasterHubContext ({ // remove if you aren't using @frames.js/debugger or you just don't want to use the debugger hub ... ( process . env . NODE_ENV === "production" ? {} : { hubHttpUrl: "http://localhost:3010/hub" , }), }), ], }); const handleRequest = frames ( async ( ctx ) => { return { image: ` ${ appURL () } /01.png` , buttons: [ < Button action = "post" key = "NextScreen" target = "/next" > 次のページへ </ Button > , ], }; }); export const GET = handleRequest ; export const POST = handleRequest ; 5. 不要なインポートの削除 createFrames によって生成された変数 frames を削除すると、createFrames 関数と farcasterHubContext 関数のインポートが不要になる(使われていないインポートは文字がグレーアウトする)ため、それらの不必要な記述を削除しコードを見やすくします。コード修正前 import { farcasterHubContext } from "frames.js/middleware" ; import { createFrames , Button } from "frames.js/next" ; import { frames } from "app/frames/frames" ; import { appURL } from "app/utils" ; const handleRequest = frames ( async ( ctx ) => { return { image: ` ${ appURL () } /01.png` , buttons: [ < Button action = "post" key = "NextScreen" target = "/next" > 次のページへ </ Button > , ], }; }); export const GET = handleRequest ; export const POST = handleRequest ; コード修正後 import { Button } from "frames.js/next" ; import { frames } from "app/frames/frames" ; import { appURL } from "app/utils" ; const handleRequest = frames ( async ( ctx ) => { return { image: ` ${ appURL () } /01.png` , buttons: [ < Button action = "post" key = "NextScreen" target = "/next" > 次のページへ </ Button > , ], }; }); export const GET = handleRequest ; export const POST = handleRequest ;
6. API エンドポイントの実装 API に接続するための準備ができたら API エンドポイントを実装していきます。
まず、API エンドポイントとして、app ディレクトリ直下に api ディレクトリを作成し、ディレクトリ内に route.tsx ファイルを作成します。
ファイルを作成したら、以下のソースコードをコピー&ペーストします。
import { init , fetchQuery } from "@airstack/node" ; import { type NextRequest , NextResponse } from "next/server" ; const apiKey = process . env . AIRSTACK_API_KEY ; if ( ! apiKey ) { throw new Error ( "AIRSTACK_API_KEY is not defined" ); } init ( apiKey ); const userDataQuery = `` ;
7. クエリのテストと変数の定義 次に、Airstack API から取得するデータのテストを行うために以下の URL にアクセスします。
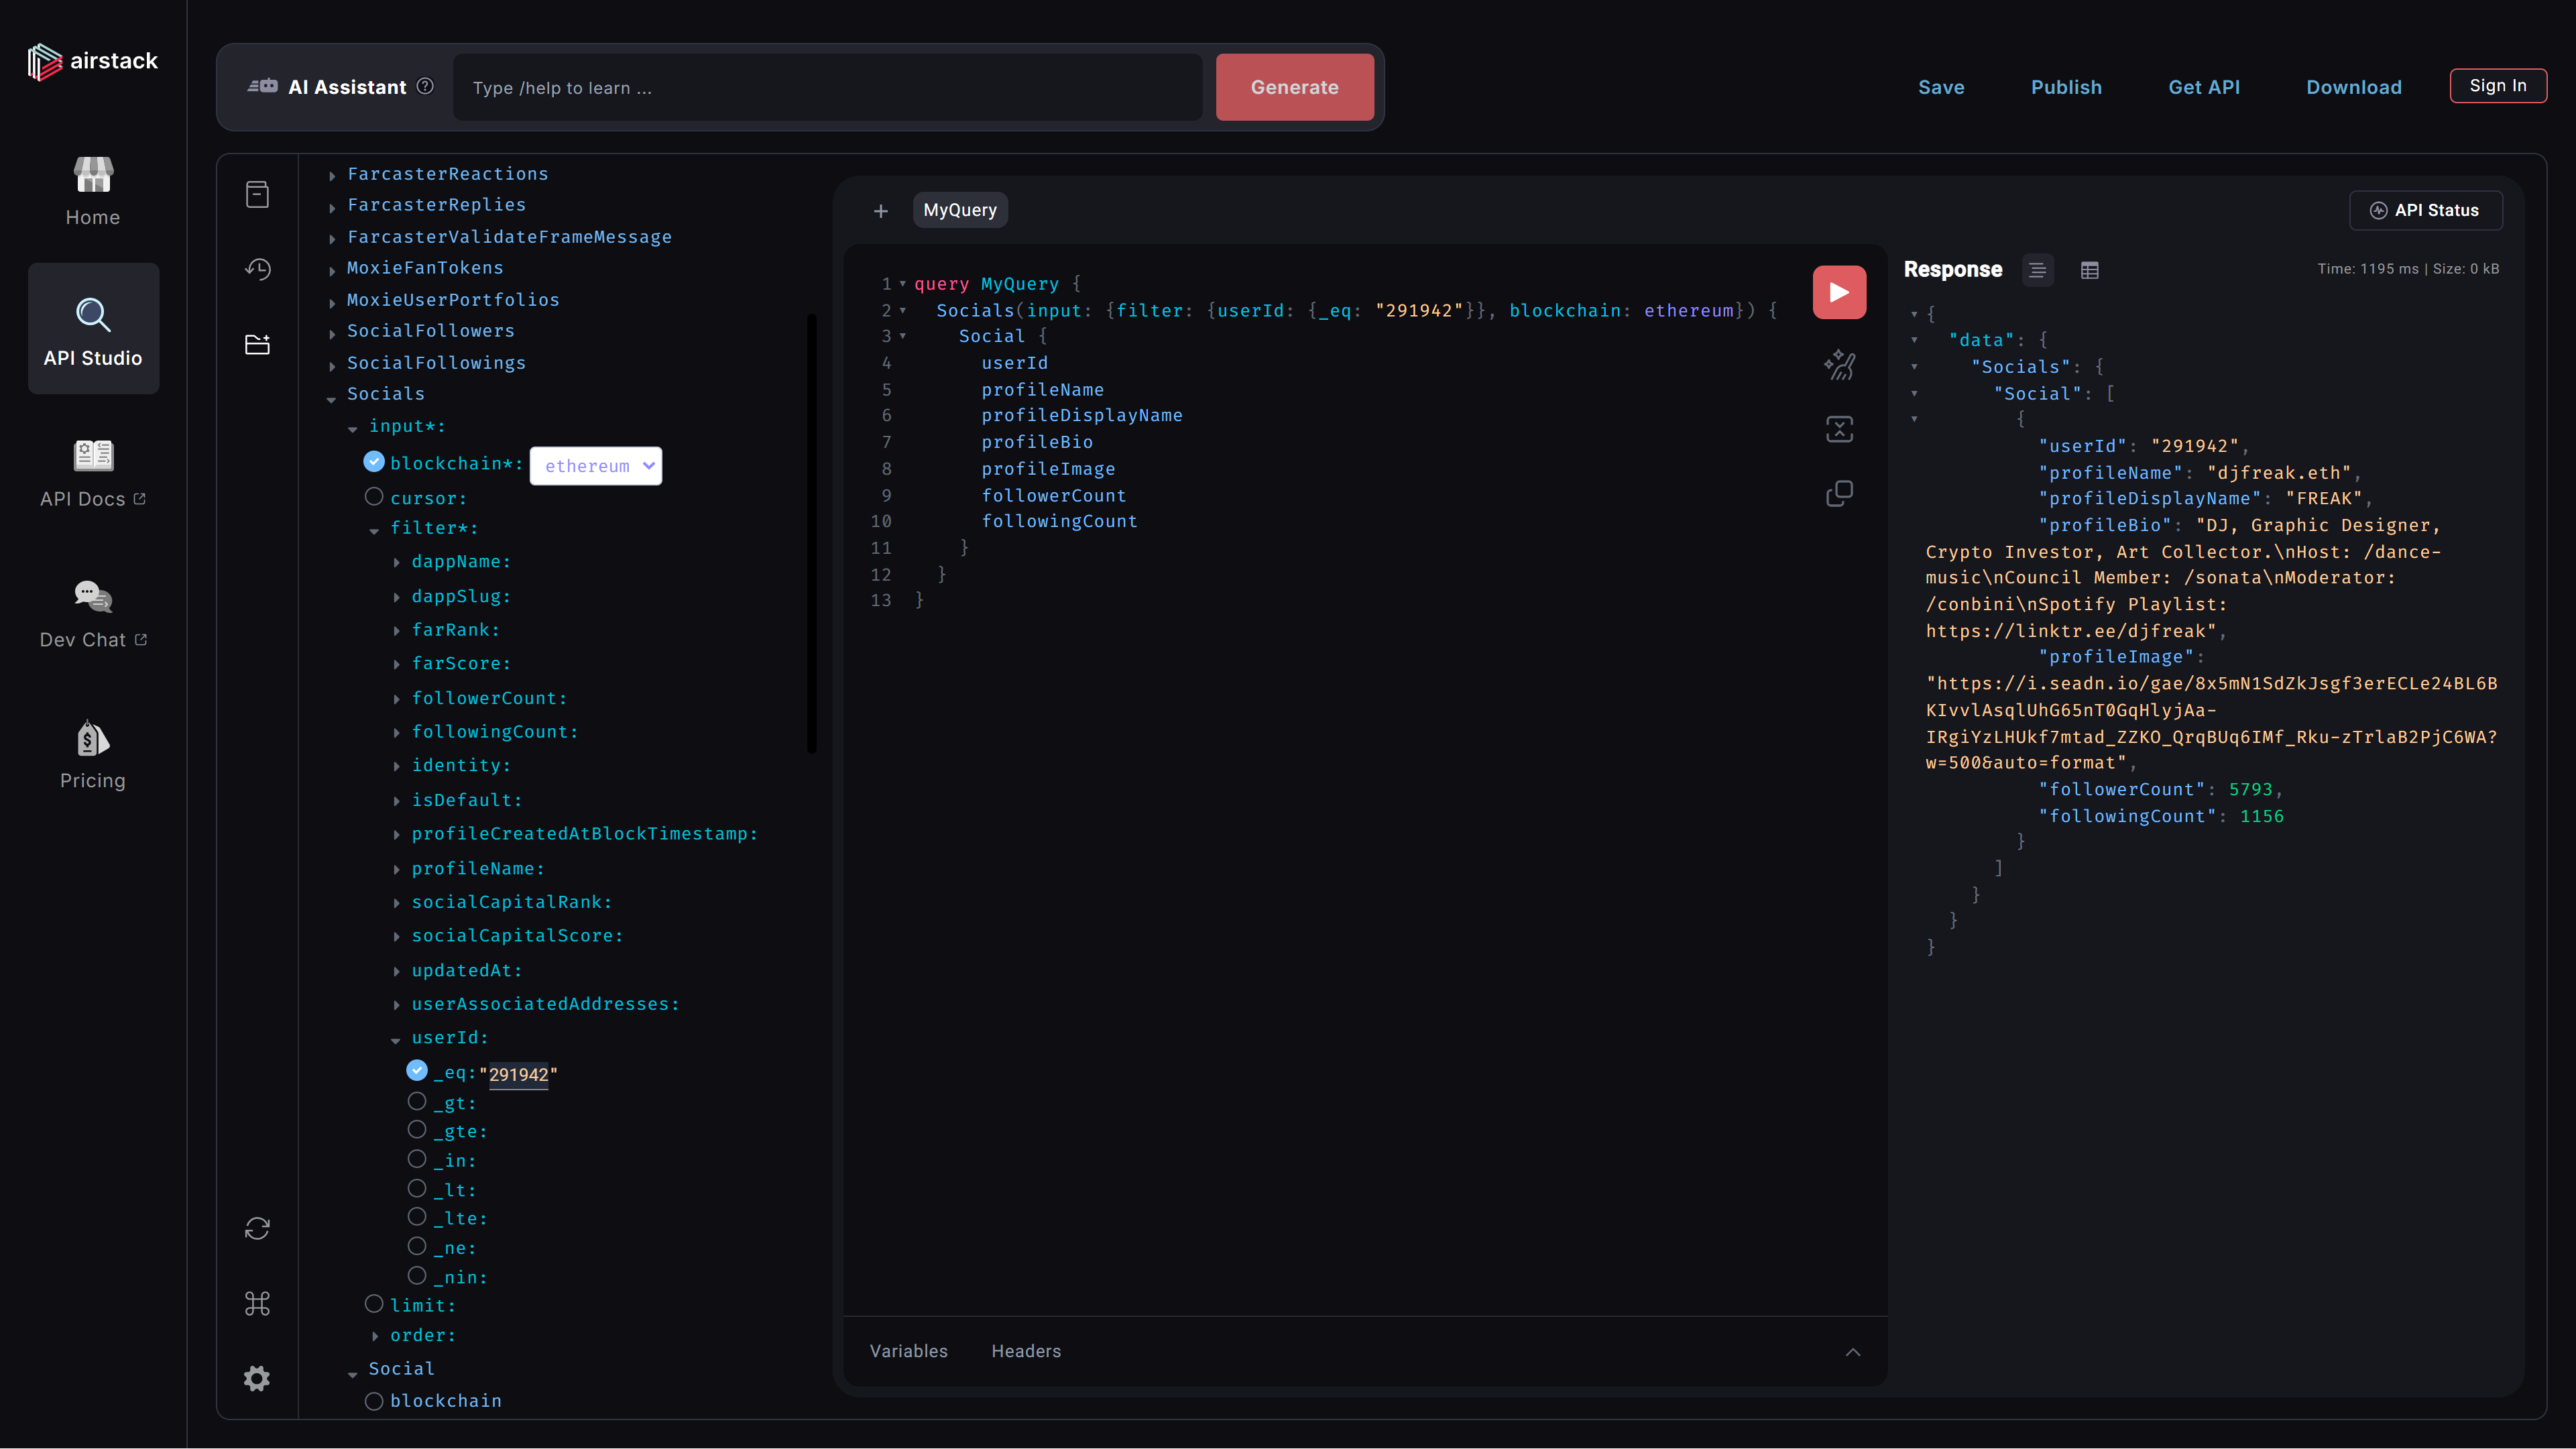
https://app.airstack.xyz/api-studio 今回はテストとしてユーザーの基本的な情報を取得して値を確認したいため、以下のように取得したいデータに必要な項目を選択し、画面右側にある 赤に右三角 のボタンをクリックします。
選択項目や FID の値に間違いがなければ Airstack API からのレスポンスとして右側に入力した FID と選択項目に応じた値が表示されるはずです。
Socials > input > blockchanin*: ethereum
Socials > input > filter*: > userId: _eq: {your_fid}
Socials > Social > userId, profileName, profileDisplayName, profileBio, profileImage, followerCount, followingCount
テストが問題なく行えたら、API エンドポイントで実行する GraphQL クエリを userDataQuery 変数として定義します。
import { init , fetchQuery } from "@airstack/node" ; import { type NextRequest , NextResponse } from "next/server" ; const apiKey = process . env . AIRSTACK_API_KEY ; if ( ! apiKey ) { throw new Error ( "AIRSTACK_API_KEY is not defined" ); } init ( apiKey ); const userDataQuery = ` query MyQuery { Socials(input: {filter: {userId: {_eq: "入力したFID"}}, blockchain: ethereum}) { Social { userId profileName profileDisplayName profileBio profileImage followerCount followingCount } } } ` ; このままだと 入力したFID の値が固定されてしまい、リクエストするユーザーに応じたデータを取得することができないため、以下のようにクエリに少し手を加えます。
import { init , fetchQuery } from "@airstack/node" ; import { type NextRequest , NextResponse } from "next/server" ; const apiKey = process . env . AIRSTACK_API_KEY ; if ( ! apiKey ) { throw new Error ( "AIRSTACK_API_KEY is not defined" ); } init ( apiKey ); const userDataQuery = ` query MyQuery($userId: String!) { Socials(input: {filter: {userId: {_eq: $userId}}, blockchain: ethereum}) { Social { userId profileName profileDisplayName profileBio profileImage followerCount followingCount } } } ` ; 8. クエリの呼び出し クエリを userDataQuery 変数に格納したら、そのクエリを呼び出すために API エンドポイントへアクセス(HTTP GET リクエスト)があった際の処理をするための関数を実装します。
import { init , fetchQuery } from "@airstack/node" ; import { type NextRequest , NextResponse } from "next/server" ; const apiKey = process . env . AIRSTACK_API_KEY ; if ( ! apiKey ) { throw new Error ( "AIRSTACK_API_KEY is not defined" ); } init ( apiKey ); const userDataQuery = ` query MyQuery($userId: String!) { Socials(input: {filter: {userId: {_eq: $userId}}, blockchain: ethereum}) { Social { userId profileName profileDisplayName profileBio profileImage followerCount followingCount } } } ` ; export async function GET ( req : NextRequest ) { const userId = req . nextUrl . searchParams . get ( "userId" ); console . log ( "Requester userId:" , userId ); if ( ! userId ) { console . log ( "Error: userId parameter is missing" ); return NextResponse . json ({ error: "userId parameter is required" }, { status: 400 }); } try { const [ response ] = await Promise . all ([ fetchQuery ( userDataQuery , { userId })]); if ( response . error ) { console . error ( "Airstack API Error (User Data):" , response . error ); return NextResponse . json ({ error: response . error . message }, { status: 500 }); } console . log ( "userData: %o" , response . data ); return NextResponse . json ({ userData: response . data , }); } catch ( error ) { return NextResponse . json ({ error: "An unexpected error occurred" }, { status: 500 }); } } 9. API エンドポイントからデータ取得するための関数と変数を定義 API エンドポイントの実装が終わったら、今度はそれを呼び出す関数と変数を定義する必要があります。
今回のレッスンでは、フレームの最初のページから次のページへ遷移するためのボタンがクリックされたタイミングで API エンドポイントへのリクエストを行うため、/app/frames/next/route.tsx に関数を定義します。
/app/frames/next/route.tsx
import { Button } from "frames.js/next" ; import { frames } from "app/frames/frames" ; import { appURL } from "app/utils" ; const handleRequest = frames ( async ( ctx ) => { let error : string | null = null ; let isLoading = false ; const fetchUserData = async ( fid : string ) => { isLoading = true ; try { const airstackUrl = ` ${ appURL () } /api?userId= ${ encodeURIComponent ( fid ) } ` ; const airstackResponse = await fetch ( airstackUrl ); if ( ! airstackResponse . ok ) { throw new Error ( `Airstack HTTP error! status: ${ airstackResponse . status } ` ); } } catch ( err ) { console . error ( "Error fetching data:" , err ); error = ( err as Error ). message ; } finally { isLoading = false ; } }; return { image: ` ${ appURL () } /02.png` , buttons: [ < Button action = "post" target = "/" > 最初のページへ </ Button > , ], }; }); export const GET = handleRequest ; export const POST = handleRequest ; 10. リクエストユーザーの fid を取得 次に、fetchUserData でユーザーデータを取得する際に必要なリクエストユーザーの fid を取得するための処理を追加します。
/app/frames/next/route.tsx
import { Button } from "frames.js/next" ; import { frames } from "app/frames/frames" ; import { appURL } from "app/utils" ; const handleRequest = frames ( async ( ctx ) => { let error : string | null = null ; let isLoading = false ; const fetchUserData = async ( fid : string ) => { isLoading = true ; try { const airstackUrl = ` ${ appURL () } /api?userId= ${ encodeURIComponent ( fid ) } ` ; const airstackResponse = await fetch ( airstackUrl ); if ( ! airstackResponse . ok ) { throw new Error ( `Airstack HTTP error! status: ${ airstackResponse . status } ` ); } } catch ( err ) { console . error ( "Error fetching data:" , err ); error = ( err as Error ). message ; } finally { isLoading = false ; } }; let fid : string | null = null ; if ( ctx . message ?. requesterFid ) { fid = ctx . message . requesterFid . toString (); console . log ( "Using requester FID:" , fid ); } else { console . log ( "No ctx.url available" ); } console . log ( "Final FID used:" , fid ); return { image: ` ${ appURL () } /02.png` , buttons: [ < Button action = "post" target = "/" > 最初のページへ </ Button > , ], }; }); export const GET = handleRequest ; export const POST = handleRequest ; 11. 取得した fid をもとに処理を実行 最後に、fid が値として存在する場合に実行する処理を追加します。
/app/frames/next/route.tsx
import { Button } from "frames.js/next" ; import { frames } from "app/frames/frames" ; import { appURL } from "app/utils" ; const handleRequest = frames ( async ( ctx ) => { let error : string | null = null ; let isLoading = false ; const fetchUserData = async ( fid : string ) => { isLoading = true ; try { const airstackUrl = ` ${ appURL () } /api?userId= ${ encodeURIComponent ( fid ) } ` ; const airstackResponse = await fetch ( airstackUrl ); if ( ! airstackResponse . ok ) { throw new Error ( `Airstack HTTP error! status: ${ airstackResponse . status } ` ); } } catch ( err ) { console . error ( "Error fetching data:" , err ); error = ( err as Error ). message ; } finally { isLoading = false ; } }; let fid : string | null = null ; if ( ctx . message ?. requesterFid ) { fid = ctx . message . requesterFid . toString (); console . log ( "Using requester FID:" , fid ); } else { console . log ( "No ctx.url available" ); } console . log ( "Final FID used:" , fid ); if ( fid ) { await Promise . all ([ fetchUserData ( fid )]); } return { image: ` ${ appURL () } /02.png` , buttons: [ < Button action = "post" target = "/" > 最初のページへ </ Button > , ], }; }); export const GET = handleRequest ; export const POST = handleRequest ; 処理が問題なく実行された場合、以下のようなログがターミナルに表示されます。
userData: { Socials: { Social: [ { userId: '291942', profileName: 'djfreak.eth', profileDisplayName: 'FREAK', profileBio: 'DJ, Graphic Designer, Crypto Investor, Art Collector.\n' + 'Host: /dance-music\n' + 'Council Member: /sonata\n' + 'Moderator: /conbini\n' + 'Spotify Playlist: https://linktr.ee/djfreak' , profileImage: 'https://i.seadn.io/gae/N1SdZkJsgf3erECLe24BL6BKIvvlAsqlUhG65nT0GqHlyjAa-IRgiYzLHUkf7mtad_ZZKO_QrqBUq6IMf_Rku-zTrlaB2PjC6WA?w=500&auto=format', followerCount: 5793, followingCount: 1156 }, [length] : 1 ] } }
12. 最終的なソースコード
Source Code GitHub Repository: Lesson 2