> ## Documentation Index
> Fetch the complete documentation index at: https://basecamp.mintlify.site/llms.txt
> Use this file to discover all available pages before exploring further.
# Version Control
> バージョンコントロールのセットアップ
## 1. GitHub アカウントの取得
GitHub の ホームページにアクセスし、新規アカウントを作成します。
[https://github.com/signup](https://github.com/signup)
すでにアカウントをお持ちの方はこの手順は不要です
## 2. Git のインストール
以下の手順に従って Git のセットアップを行います。
### 1. インストーラーのダウンロード
Git の ホームページにアクセスし、インストーラーをダウンロードします。
[https://gitforwindows.org/](https://gitforwindows.org/)
### 2. インストール
1. ダウンロードしたインストーラーを実行します。
2. インストーラーが起動したら、Next をクリックします。
3. **Select Components** の画面が表示されたら、**Next** をクリックします。
4. **Choosing the default editor used by Git** の画面が表示されたら、**Next** をクリックします。
5. **Adjusting the name of the initial branch in new repositories** の画面が表示されたら、**Override the default branch name for new repositories** にチェックを入れ、**Next** をクリックします(この時に入力欄に自動的に main が入力されます)。
6. **Adjusting your PATH environment** の画面が表示されたら、**Next** をクリックします。
7. **Choose the SSH executable** の画面が表示されたら、**Next** をクリックします。
8. **Choosing HTTPS transport backend** の画面が表示されたら、**Next** をクリックします。
9. **Configuring the line ending conversions** の画面が表示されたら、**Next** をクリックします。
10. **Configuring the terminal emulator to use with Git Bash** の画面が表示されたら、**Next** をクリックします。
11. **Choose the default behavior of git pull** の画面が表示されたら、**Next** をクリックします。
12. **choose a credential helper** の画面が表示されたら、**Next** をクリックします。
13. **Configuring extra options** の画面が表示されたら、両方にチェックを入れ、**Next** をクリックします。
14. **Configuring experimental options** の画面が表示されたら、**Install** をクリックします。
15. **Completing the Git Setup Wizard** の画面が表示されたら、**Finish** をクリックしインストールは完了です。
### 3. インストールの確認
正常にインストールされたか確認するために、PowerShell を開いて以下のコマンドを実行します。
```bash theme={null}
git -v
```
または
```bash theme={null}
git --version
```
インストールが正常に行われていれば以下のようにバージョンが表示されます。
```
git version 2.47.0.windows.1
```
## 3. Git クライアントのセットアップ
今回は Git のクライアントとして Fork を使用します。
CLI(コマンドラインインターフェース)から Git を使う場合はこの手順は不要です
### 1. Fork のインストール
Fork の ホームページにアクセスし、**Download Fork for Windows** をクリックしてインストーラーをダウンロードします。
[https://git-fork.com/](https://git-fork.com/)
### 2. Fork の初期設定
Fork をインストール後の初回起動時に **User Information** の画面が表示されるため、**UserName**、**Email** に任意の情報を入力、**Default source folder** は右のアイコンから PC 内の任意のディレクトリを選択し **Finish** をクリック。
### 3. GitHub アカウントとの連携
1. Fork のメニューから **File > Accounts** を選択。
2. 画面左下の **+** ボタンをクリック。
3. 一覧から **GitHub** を選択し **Log in** ボタンをクリック。
4. **Log in to GitHub** の画面が表示されるため、プルダウンから **Personal Access Token** を選択し **Access Token** 欄の下の **Manage personal sccess token** の青文字部分をクリック。
5. **Personal Access Token** のページが表示されたら、**Expiration** を任意の期間に設定。
プライベートリポジトリを操作する必要がある場合は、以下のスクリーンショットのように **Select scopes** の **repo** にチェックを入れます。
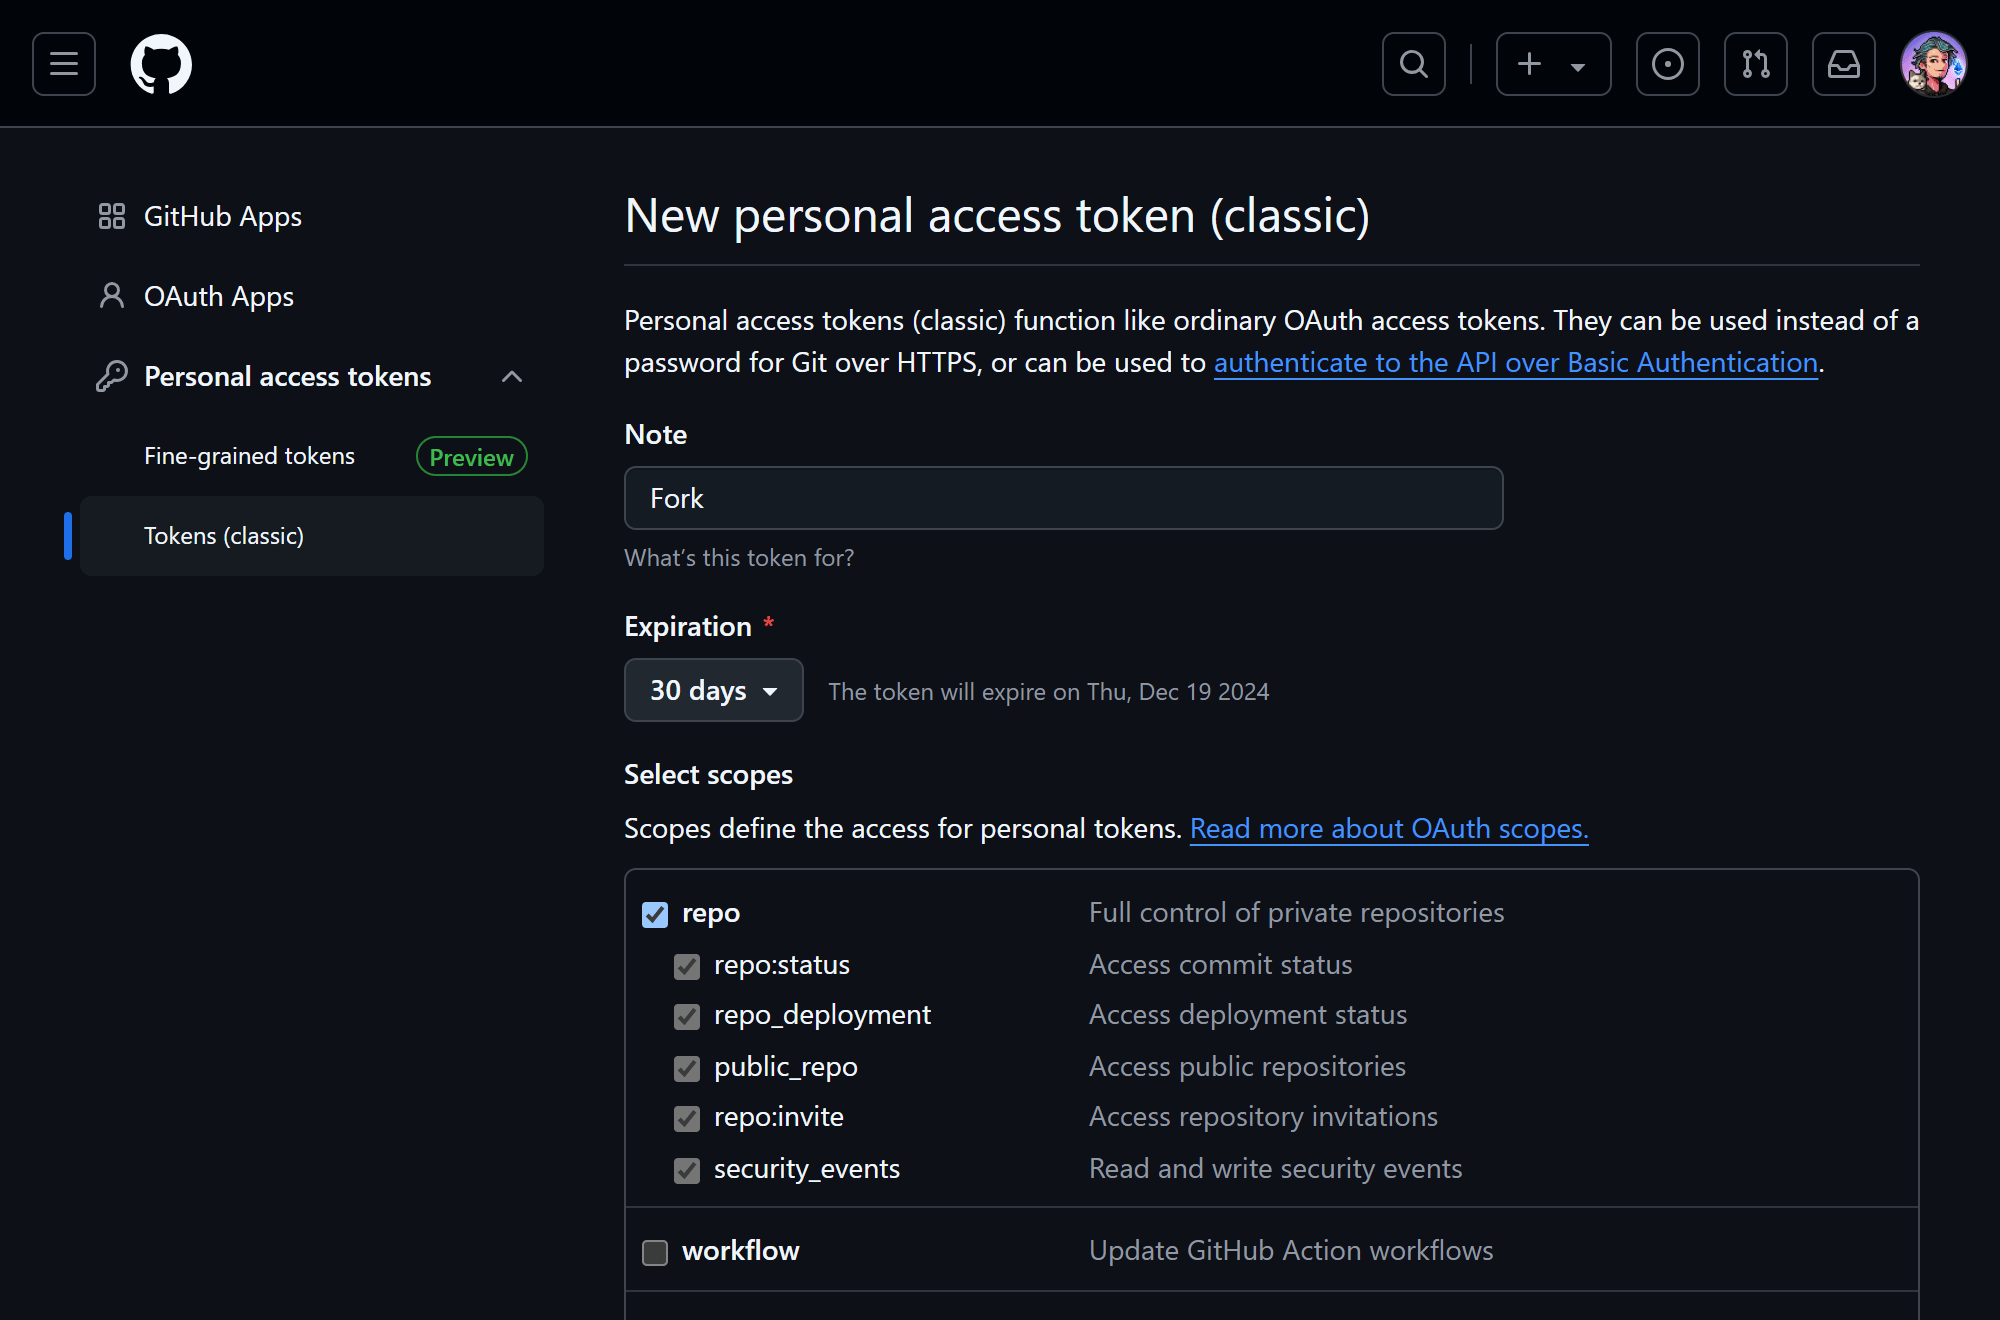 6. 画面一番下の **Generate token** ボタンをクリックしてトークンを生成。
7. 次の画面でトークンが表示されるため右側のアイコンをクリックしてトークンの値をコピー。
8. Fork の **Access Token** 欄にコピーしたトークンを貼り付け、**Sign in** ボタンをクリック。
6. 画面一番下の **Generate token** ボタンをクリックしてトークンを生成。
7. 次の画面でトークンが表示されるため右側のアイコンをクリックしてトークンの値をコピー。
8. Fork の **Access Token** 欄にコピーしたトークンを貼り付け、**Sign in** ボタンをクリック。